オンライン決済サービスStripe(ストライプ)の簡単導入
世界中で利用されているオンライン決済サービスStripe(ストライプ)ですが、数多くの企業や個人のサイトで利用されるメリットは以下のような点が考えられます。
- 多くの国や通貨に対応しているため国際的な取引が可能
- 豊富なAPIやツール、ドキュメントが用意されている
- クレジットカードをはじめ、Apple Pay、Google Pay、コンビニ決済にも対応
- 大手企業はもちろん、個人レベルでの利用も可能
他にもメリットは多くありますが、反面、豊富なドキュメントや利用方法がわかりにくさとなってしまっている点もあるのかもしれません。
導入方法も様々な形式が用意されており、Stripeのページへのリンクを設置するものや自社サイト内のページで決済させるものなど簡易的なものから多くのカスタマイズが可能なものまで存在することが導入時のハードルとなってしまっている可能性も否めません。
また、API関連は随時アップデートされており、新しいフォーマットのものも公開されておりますので、インターネット上に多く掲載されている導入方法やコードの解説が現在Stripeが勧める形式のものではない場合もあるようです。
Stripe決済の導入を検討しているが、公式サイトを見ても少しわかりにくいと感じているような方向けにサンプルコードをまとめました。
PHPベースでフォームを設置する際に必要となるライブラリはcomposerを使用してダウンロードするか、GitHubよりダウンロードするよう公式サイトではアナウンスされておりますが、composerやGitHubに慣れていない方向けにダウンロード用圧縮ファイルはライブラリを含めた状態となっております。設定は必要ですが、基本的にダウンロードファイルを使用して決済処理を行えるような状態です。
オンライン決済サービスを導入したいケースとして多く考えられる「通販サイト」向けにまとめておりますので、現在ECショップを運営していて(あるいはこれから始めようとしていて)、カード決済を可能にしたいという方にご確認していただければと思います。
ダウンロードファイルのご利用条件
下記をご了解いただきダウンロード・ご利用いただけますようお願い致します。ダウンロードを行った時点でご了承頂いたものとさせて頂きます。
- このページよりダウンロード頂きましたファイル、またはファイルを元に改変されたものを使用した際の不具合等につきましては自己責任でお願い致します。
- ダウンロードされたファイルのご利用、改変は自由ですが、ご利用に伴う不具合、損失等につきましては対応できませんのですべて自己責任でお願い致します。
- 本稼働前に必ずStripeのテストモードをご利用頂くなどして十分なテストとご確認をお願い致します。
- 修正や改良によって予告なく順次内容を更新する場合がございます。

Stripe Card Element
StripeのCard Elementを使用したフォーマットのカード決済用フォームです。
数多く存在するStripeのフォームの中でもおそらく最もベーシックでシンプルなタイプのフォームです。
シンプルな作りのフォームですのでサイトに合わせたカスタマイズをする際には適したフォームだと思われます。
このサンプルフォームはカード番号等を入力後、決済ボタン(Pay now)を押下した後に何らかの理由により決済エラー(決済失敗)が起きた場合にはStripeのダッシュボードから確認できる支払い情報に決済エラーデータは残りません。支払い情報に使用しない決済エラーデータを残したくない場合にはこちらがおすすめです。
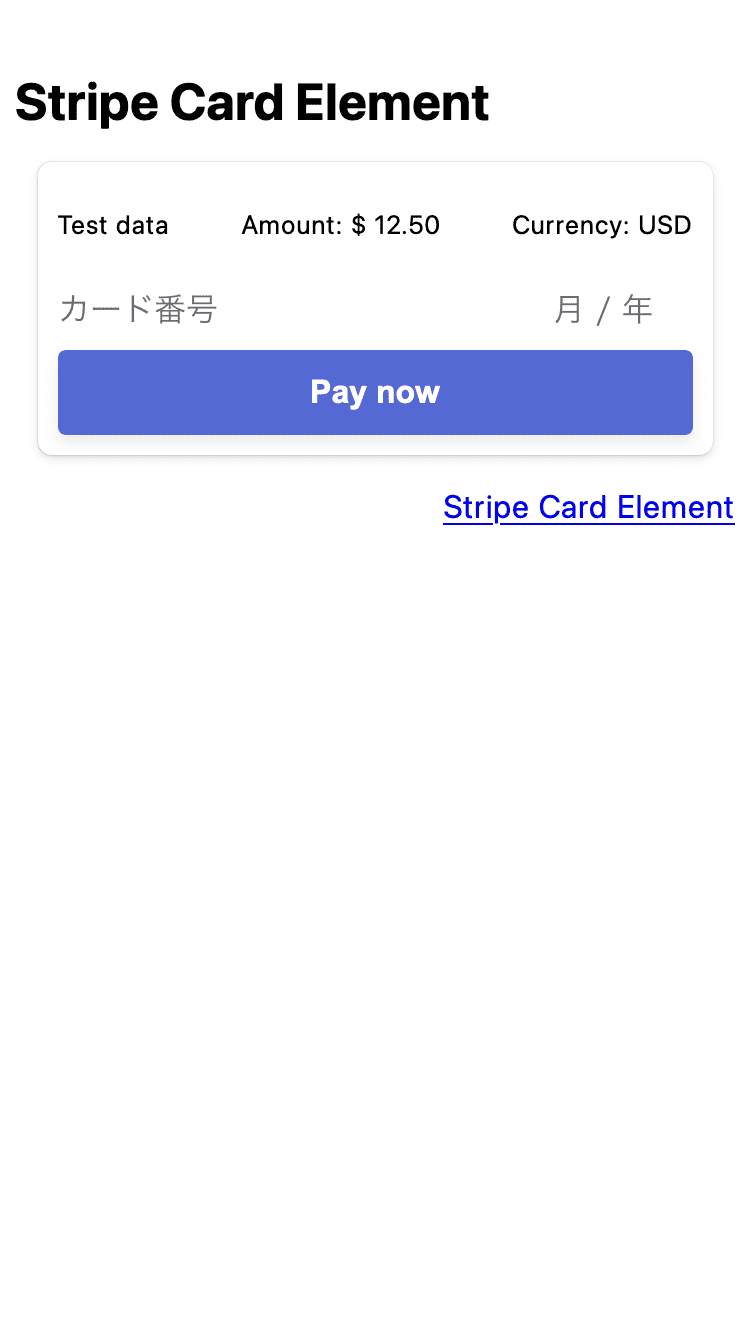
フォームの表示は画像のような状態となります。この画像では通貨をUSD(米ドル)として、金額を$12.50とした場合の表示です。金額や通貨、その他項目についてはご利用の際に設定いただく形となります。
Downloadはこちら
※ダウンロードファイルに含まれるライブラリ(stripe/stripe-php)はv13.6.0です。
ダウンロードファイル(card.zip)を解凍した Stripe Card Element の構成

card
 │
 ├── index.php                  フォームを表示するページ
 │
 ├── checkout.css             Stripeのデフォルトstylesheetファイル
 │
 ├── card_element.js        Card Element フォームを設置・動作するscriptファイル
 │
 ├── card_element.php     card_element.jsと連携しStripeと通信するサーバー側のファイル
 │
 ├── secrets.php               Stripeで取得した secret key を設定
 │
 └── vendor                      ライブラリ(stripe/stripe-php)
必要最低限ですがファイルの中で設定が必要な部分、確認が必要な部分については下記の通りです。サイトに合わせ適時変更してください。
[ index.php ]
    :
<form id="card-form" method="POST">
このフォーム内にサイトで使用する送信データを含めることで決済完了後、データを送信することが可能です。
<div class="cart">
以下はStripeの決済で送信するデータです。amountは必須です。currencyはinputタグ等で指定がない場合、JPY(日本円)としてscript側で処理しております。
通貨によっては一般に少数点以下の表記を行う通貨(例えば米ドル)は、整数としてStripeへ送信、決済を行う必要があります。
通貨・金額については公式サイトをご確認ください。
<p>Test data
<label>Amount: $ 12.50 <input type="hidden" name="amount" value="1250"></label>
<label>Currency: USD <input type="hidden" name="currency" value="usd"></label>
</p>
以下もStripeの決済で送信するデータですが必要であればStripeダッシュボードで確認できるデータとして保存できます。
<input type="hidden" name="description" value="">
<input type="hidden" name="city" value="">
<input type="hidden" name="country" value="">
<input type="hidden" name="line1" value="">
<input type="hidden" name="line2" value="">
<input type="hidden" name="postal_code" value="">
<input type="hidden" name="state" value="">
<input type="hidden" name="email" value="">
<input type="hidden" name="name" value="">
<input type="hidden" name="phone" value="">
</div>

<div id="card-element">
<!-- a Stripe Element will be inserted. -->
</div>
<button id="submitBtn">
<div class="spinner hidden" id="spinner"></div>
<span id="button-text">Pay now</span>
</button>
<div id="payment-message" class="hidden"></div>
</form>
    :
[ card_element.js ]
    :
// Stripe public key
const stripePK = 'ここにStripeで取得した public key を設定';

// Server api url  fetchURLにcard_element.phpのURLを設定  ファイルの位置を変更する場合は変更します
const siteURL = location.href.replace(/^(.+)/[^/]*$/u, '$1');
const fetchURL = siteURL + '/card_element.php';

// After payment message
const checkStatusMessage = {
  usd: {
    succeeded: 'Payment succeeded!',
    processing: 'Your payment is processing.',
    requires_payment_method: 'Your payment was not successful, please try again.',
    requires_capture: 'Payment verification succeeded!',
    requires_action: 'Your payment procedure succeeded!',
    default: 'Something went wrong.'
  },
  jpy: {
    succeeded: 'お支払いが完了しました。',
    processing: 'お支払いは処理中です。',
    requires_payment_method: 'お支払いは正常に完了しませんでした。もう一度お試しください。',
    requires_capture: 'お支払い認証が完了しました。',
    requires_action: 'お支払い手続きが完了しました。',
    default: '何か問題が発生しました。'
  }
};

// Form element  formのidを指定してDOMを取得
const form = document.getElementById('card-form');

// Stripe order description  Stripeダッシュボードで表示されるdescription設定  form内にdescriptionデータの設定があればformのデータで上書きされます
const description = 'Stripe order';

// Amount and currency  formのamountを取得して設定  デフォルトのcurrencyを設定  form内にcurrencyデータの設定があればformのデータで上書きされます
const amount = parseInt(form.amount.value, 10);
const currency = (form.currency) ? form.currency.value : 'jpy';

// Capture_method    Default is automatic.    [ automatic | automatic_async | manual ]
const capture_method = 'automatic';

// Set up future usage    [ null | off_session | on_session ]    https://stripe.com/docs/api/payment_intents/object#payment_intent_object-setup_future_usage
const setup_future_usage = null;

// URL where the customer should be redirected after the PaymentIntent is confirmed
const returnURL = location.href;
const addQueryAfterSubmit = true; // If this value is set to true, display checkStatusMessage after submit.
    :
[ secrets.php ]
<?php
// Keep your Stripe API key protected by including it as an environment variable
// or in a private script that does not publicly expose the source code.

// This is your test secret API key.
$stripe_secret_key = 'ここにStripeで取得した secret key を設定';

Stripe Payment Element
StripeのPayment Elementを使用したフォーマットのカード決済用フォームです。
Stripeのフォームの中でも比較的新しいフォームで、Stripeの公式サイトを見ていると現在はこちらのフォームをStripeはおすすめしているように見えます。
Stripeのダッシュボードからの設定次第でカード決済以外にも、Apple Pay、Google Pay、コンビニ決済なども利用できるフォームとなります。
このサンプルフォームはカード番号等を入力後、決済ボタン(Pay now)を押下した後に何らかの理由により決済エラー(決済失敗)が起きた場合にはStripeのダッシュボードから確認できる支払い情報に決済失敗のエラーデータが残ります。
このサンプルフォームはカード番号等を入力後、決済ボタン(Pay now)を押下した後に何らかの理由により決済エラー(決済失敗)が起きた場合にはStripeのダッシュボードから確認できる支払い情報に決済エラーデータは残りません。支払い情報に使用しない決済エラーデータを残したくない場合にはこちらがおすすめです。
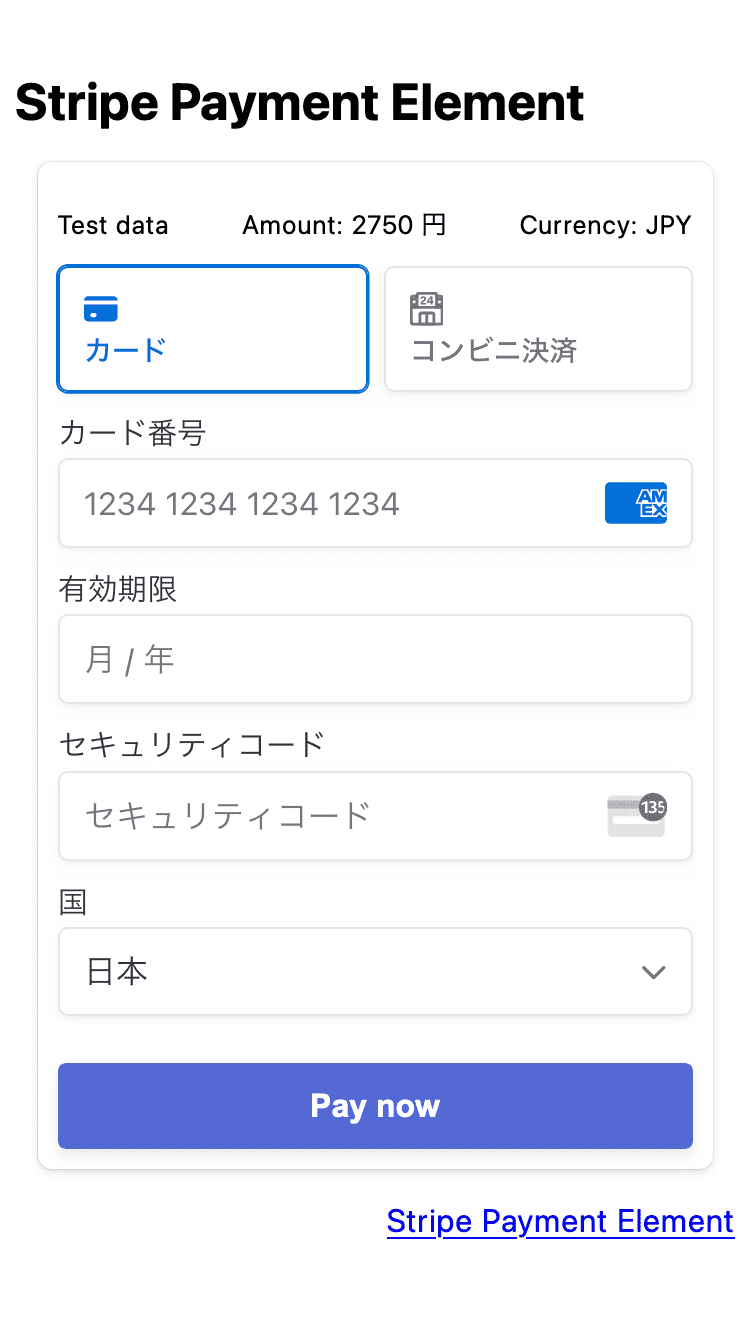
フォームの表示は画像のような状態となります。この画像では通貨をJPY(日本円)として、金額を2750円とした場合の表示です。Stripe Card Elementと同様、金額や通貨、その他項目についてはご利用の際に設定いただく形となります。
Downloadはこちら
※ダウンロードファイルに含まれるライブラリ(stripe/stripe-php)はv13.6.0です。
ダウンロードファイル(payment.zip)を解凍した Stripe Payment Element の構成

payment
 │
 ├── index.php                  フォームを表示するページ
 │
 ├── checkout.css             Stripeのデフォルトstylesheetファイル
 │
 ├── payment_element.js        Payment Element フォームを設置・動作するscriptファイル
 │
 ├── payment_element.php     payment_element.jsと連携しStripeと通信するサーバー側のファイル
 │
 ├── secrets.php               Stripeで取得した secret key を設定
 │
 └── vendor                      ライブラリ(stripe/stripe-php)
必要最低限ですがファイルの中で設定が必要な部分、確認が必要な部分については下記の通りです。サイトに合わせ適時変更してください。
[ index.php ]
    :
<form id="payment-form" method="POST">
このフォーム内にサイトで使用する送信データを含めることで決済完了後、データを送信することが可能です。
<div class="cart">
以下はStripeの決済で送信するデータです。amountは必須です。currencyはinputタグ等で指定がない場合、JPY(日本円)としてscript側で処理しております。
通貨によっては一般に少数点以下の表記を行う通貨(例えば米ドル)は、整数としてStripeへ送信、決済を行う必要があります。
通貨・金額については公式サイトをご確認ください。
<p>Test data
<label>Amount: 2750 円 <input type="hidden" name="amount" value="2750"></label>
<label>Currency: JPY <input type="hidden" name="currency" value="jpy"></label>
</p>
以下もStripeの決済で送信するデータですが必要であればStripeダッシュボードで確認できるデータとして保存できます。
<input type="hidden" name="description" value="">
<input type="hidden" name="city" value="">
<input type="hidden" name="country" value="">
<input type="hidden" name="line1" value="">
<input type="hidden" name="line2" value="">
<input type="hidden" name="postal_code" value="">
<input type="hidden" name="state" value="">
<input type="hidden" name="email" value="">
<input type="hidden" name="name" value="">
<input type="hidden" name="phone" value="">
</div>

<div id="payment-element">
<!--Stripe.js injects the Payment Element-->
</div>
<button id="submitBtn">
<div class="spinner hidden" id="spinner"></div>
<span id="button-text">Pay now</span>
</button>
<div id="payment-message" class="hidden"></div>
</form>
    :
[ payment_element.js ]
    :
// Stripe public key
const stripePK = 'ここにStripeで取得した public key を設定';

// Server api url  fetchURLにpayment_element.phpのURLを設定  ファイルの位置を変更する場合は変更します
const siteURL = location.href.replace(/^(.+)/[^/]*$/u, '$1');
const fetchURL = siteURL + '/payment_element.php';

// After payment message
const checkStatusMessage = {
  usd: {
    succeeded: 'Payment succeeded!',
    processing: 'Your payment is processing.',
    requires_payment_method: 'Your payment was not successful, please try again.',
    requires_capture: 'Payment verification succeeded!',
    requires_action: 'Your payment procedure succeeded!',
    default: 'Something went wrong.'
  },
  jpy: {
    succeeded: 'お支払いが完了しました。',
    processing: 'お支払いは処理中です。',
    requires_payment_method: 'お支払いは正常に完了しませんでした。もう一度お試しください。',
    requires_capture: 'お支払い認証が完了しました。',
    requires_action: 'お支払い手続きが完了しました。',
    default: '何か問題が発生しました。'
  }
};

// Form element  formのidを指定してDOMを取得
const form = document.getElementById('payment-form');

// Stripe order description  Stripeダッシュボードで表示されるdescription設定  form内にdescriptionデータの設定があればformのデータで上書きされます
const description = 'Stripe order';

// Amount and currency  formのamountを取得して設定  デフォルトのcurrencyを設定  form内にcurrencyデータの設定があればformのデータで上書きされます
const amount = parseInt(form.amount.value, 10);
const currency = (form.currency) ? form.currency.value : 'jpy';

// Capture_method    Default is automatic.    [ automatic | automatic_async | manual ]
const capture_method = 'automatic'; // If this value is set to 'Manual', then 'Card' is the only payment method available.

// Set up future usage    [ null | off_session | on_session ]    https://stripe.com/docs/api/payment_intents/object#payment_intent_object-setup_future_usage
const setup_future_usage = null; // If this value is set to 'off_session' or 'on_session', then 'Card' is the only payment method available.

// URL where the customer should be redirected after the PaymentIntent is confirmed
const returnURL = location.href;
const addQueryAfterSubmit = true; // If this value is set to true, display checkStatusMessage after submit.
const isRedirect = false; // If this value is set to true, the checkStatusMessage will be displayed after submission, but the form input values will not be submitted.
    :
[ secrets.php ]
<?php
// Keep your Stripe API key protected by including it as an environment variable
// or in a private script that does not publicly expose the source code.

// This is your test secret API key.
$stripe_secret_key = 'ここにStripeで取得した secret key を設定';
現在、運用中のECサイトをお持ちの方はダウンロードファイルをカスタマイズして頂ければ、Stripe決済を行える状態とすることが可能です。
決済情報についてはStripeのダッシュボードを利用するということであれば、各種サイトシステム(例えば WordPress + Welcart 等)に組み合わせて使用することも可能です。
ご希望があればサイトへの設置・設定のご相談を承っておりますので、まずはお気軽にお問い合わせフォームよりご相談ください。